

JavaScript is a crucial part of web development. Whether it’s client-side scripts making web pages dynamic, server-side code running on Node.js, or even mobile and desktop applications, JavaScript is there. This prevalence isn’t without its share of challenges, particularly when it comes to security.
In an era where cyber threats have become increasingly sophisticated, understanding how to write secure JavaScript code is more important than ever. This goes beyond just knowing the syntax and the APIs. It’s about understanding the ecosystem, the potential pitfalls, the attack vectors that malicious actors use, and the strategies that can help mitigate these risks.
In this article, we will tackle these challenges head-on. We will discuss common JavaScript vulnerabilities, from cross-site scripting (XSS) and cross-site request forgery (CSRF), to more complex issues like prototype pollution and insecure dependencies. We will look at real-world examples, learn about the potential impact of these vulnerabilities, and, most importantly, talk about solutions.
We will also dive into the tools and practices that can help you fortify your JavaScript code. This includes Content Security Policies (CSP), and more. By the end of this guide, you’ll have a comprehensive understanding of the JavaScript security landscape.
This isn’t just about making your applications secure today, but also about instilling a mindset of security that will guide your development practices in the future.
What is Same-Origin Policy?
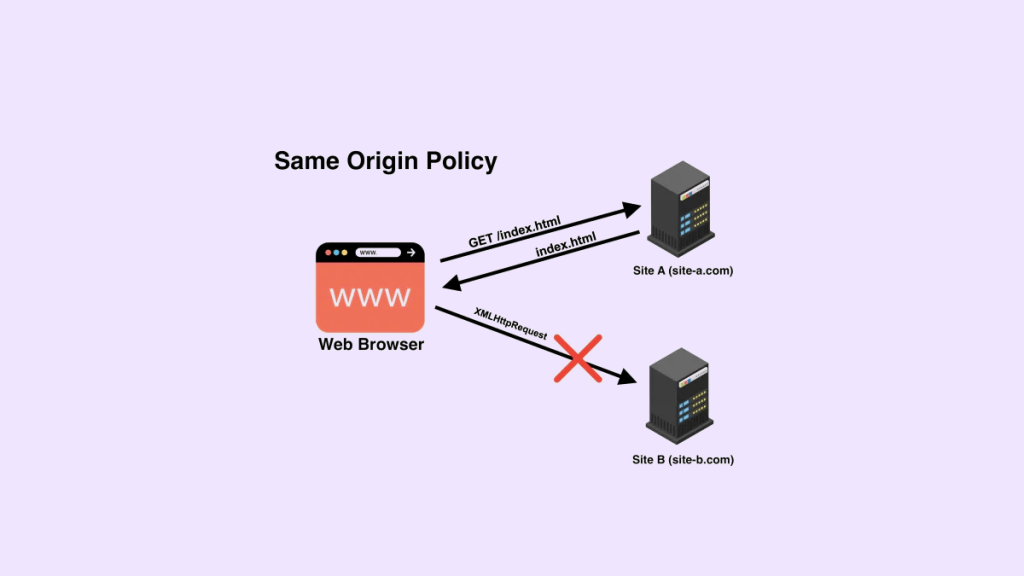
Same-origin policy is a fundamental aspect of web security that prevents web pages from accessing data or resources from other domains. The policy states that JavaScript running on one domain should not be able to access or manipulate content on another domain. This restriction applies to all resources, including cookies, local storage, and HTTP requests.
For example, suppose you have two websites, www.example.com and www.test.com. If a user visits www.example.com and the site runs JavaScript code, this code can only access data within its own domain. It cannot access any resources on www.test.com due to same-origin policy restrictions.
Why is Same-Origin Policy Important?
The same-origin policy is crucial for protecting user data and ensuring the privacy of web users online. Without this restriction, malicious scripts could easily steal user information like credit card numbers or login credentials by accessing data on other domains without user consent.
The same-origin policy helps protect against Cross-site scripting (XSS) attacks where an attacker injects malicious code into a website to steal sensitive information from users or make unauthorized changes to the website’s content.
In addition to protecting users’ data and privacy, the same-origin policy also helps prevent websites from breaking each other’s functionality when they embed content from different sources.
How Does Same-Origin Policy Work?
Same-origin policy works by comparing the origin (scheme, host name, and port) of the page making a request with the origin of the requested resource. If both origins match precisely, then the request is allowed; otherwise, it’s blocked.
For example:
Suppose you visit https://www.example.com/login.html which contains some JavaScript code, and this code tries to fetch data from https://www.example.com/api/data/sensitive.json.
In this case, the same-origin policy allows the request because both the page and the resource have the same origin.
However, if the code tries to fetch data from https://www.test.com/api/data/sensitive.json, then the request will be blocked because both origins don’t match.
How to Implement the Same-Origin Policy
To implement same-origin policy in your JavaScript code, you can use the document.domain property. The domain property specifies the domain name of a URL.
By setting this value to the same domain across your web pages, you can enable communication between them even if they are loaded from different subdomains or ports.
For example:
Suppose you have two web pages loaded from different subdomains: www.example.com and api.example.com. If you want to allow communication between them using JavaScript, you can set both their domain properties to example.com by including this code on both pages:
document.domain = "example.com";Now, any JavaScript running on either page can access resources on the other page as long as it’s loaded from example.com.
Another way of implementing same-origin policy in your JavaScript code is by using Cross-Origin Resource Sharing (CORS). CORS is a mechanism that allows web applications to make requests to another domain outside of their own origin. It works by adding specific HTTP headers that specify which domains are allowed to access certain resources.
For example:
Suppose you have an API endpoint located at www.api.example.com that serves JSON data. If you want other websites like www.myclientapp.com to access this data using JavaScript, you can configure CORS headers on your API server like this:
Access-Control-Allow-Origin: https://www.myclientapp.com
Access-Control-Allow-Methods: GET, POST
This configuration tells browsers that requests coming from https://www.myclientapp.com are allowed to access resources on www.api.example.com using GET or POST methods.
What is Cross-Site Scripting?
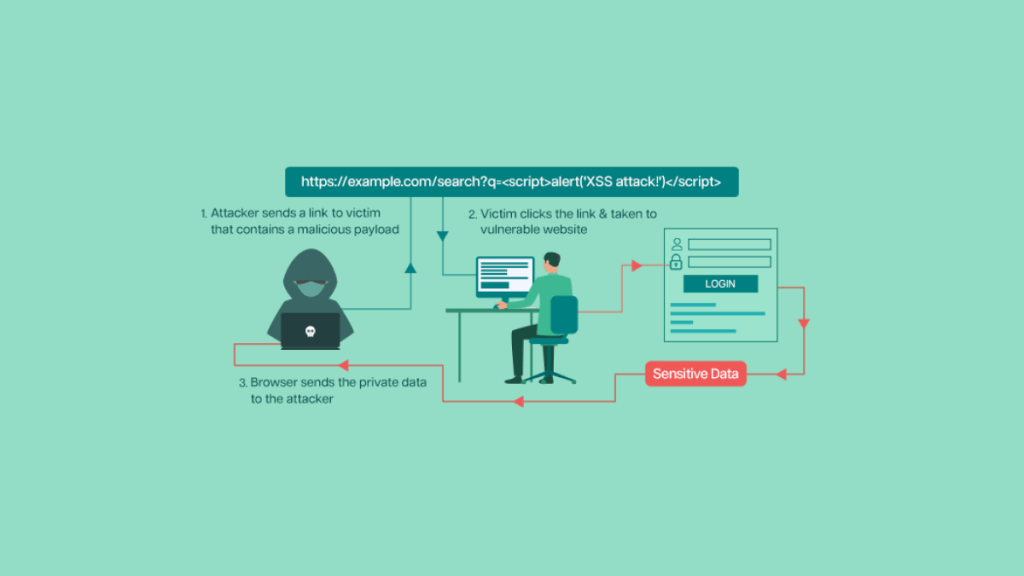
Cross-Site Scripting (XSS) is an attack in which an attacker injects malicious code into a web page viewed by other users. The injected code executes in the context of the user’s browser, allowing the attacker to steal sensitive information or perform other malicious actions.
There are three main types of XSS attacks:
Reflected XSS
Reflected XSS occurs when an attacker injects script code that is then reflected back to the user. This can happen when users submit data to a web application that is not properly validated by the server.
For example, if a search box on a website does not validate input from users before sending it back to them, an attacker could enter a script that steals their login credentials.
Stored XSS
Stored XSS involves injecting malicious code directly into a web page or database that is then executed whenever someone visits that page.
This can happen when a website allows users to post comments or other content that is not properly sanitized before being stored in the database. An attacker could post a comment with script code that steals sensitive information from anyone who views it.
DOM-based XSS
DOM-based XSS occurs when JavaScript on the client-side takes input from the user and sends it to another part of the website without proper validation.
This can happen when JavaScript dynamically generates content or updates parts of a web page based on user input, and fails to sanitize this input correctly. An attacker could use this vulnerability to inject malicious scripts into parts of the page and execute them in unsuspecting users’ browsers.
How to Prevent Cross-Site Scripting Attacks
To prevent Cross-Site Scripting attacks, you need to identify potential vulnerabilities in your code and take steps to mitigate them. Here are some best practices for preventing XSS attacks.
1. Validate input from users
The first step in preventing XSS attacks is to ensure that any data coming from users is properly validated before being processed by your web application.
This means using server-side validation to check that input meets certain criteria, such as length or format. You should also sanitize any data that will be displayed on the page, removing any special characters or scripts that could be used in an attack.
2. Sanitize output
Even if you validate user input, it’s still important to sanitize any output that you display on the page. This includes things like user-generated content, comments, and search results.
When displaying output, use a library or framework that automatically sanitizes data, or manually sanitize it yourself. This involves removing any special characters or scripts that could be used in an attack.
3. Use Content Security Policy (CSP)
Content Security Policy (CSP) is a technology that allows website owners to specify which sources of content are allowed to be loaded on their site.
By using CSP, you can prevent malicious scripts from being executed on your site by blocking all other sources of content. For example, you can restrict loading of JavaScript code from external domains by implementing a strict CSP policy.
4. Use HTTPS
Using HTTPS is essential for protecting your website from many types of security risks, including XSS attacks.
By encrypting data sent between the client and server, HTTPS prevents attackers from intercepting sensitive information such as login credentials or credit card details.
5. Keep your software up-to-date
Keeping your software up-to-date is essential for preventing XSS attacks and other types of security risks.
This includes updating your web server software, web application framework, and any third-party libraries or plugins you use. Always make sure you apply security patches as soon as they become available.
What is Cross-Site Request Forgery (CSRF)?
Cross-Site Request Forgery (CSRF), also known as XSRF, is an attack that exploits the trust relationship between a user and a web application. The attack involves an attacker tricking a victim into executing unwanted actions on their behalf without their knowledge or consent.
The most common scenario for CSRF attacks involves the use of compromised or malicious HTML code on a website visited by the victim. This code sends HTTP requests to the victim’s browser, which are then executed by the browser when it visits another website that trusts them.
The HTTP requests sent by the malicious code can include any action performed by the user on the trusted website, including sending emails, making purchases, changing passwords or deleting data.
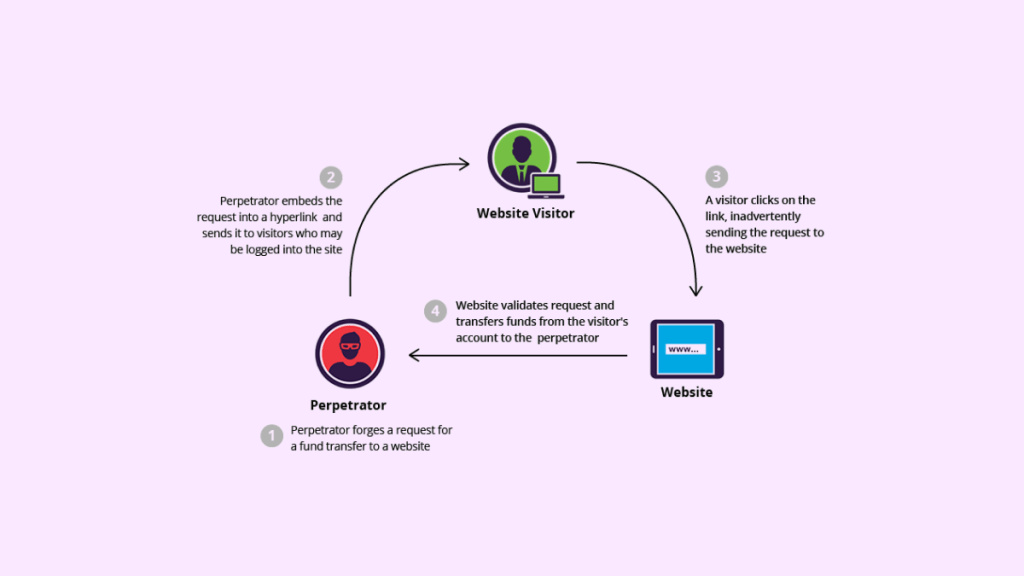
How Does Cross-Site Request Forgery Work?
To better understand how CSRF works, let’s consider an example involving an online banking application:
- A user logs into their online banking account and performs some actions.
- The user then visits another website which contains malicious code embedded in it.
- The malicious code sends an HTTP request to the banking server with instructions to transfer money from the victim’s account.
- The request appears legitimate since it has been sent from the user’s browser session with valid credentials.
- The server processes the request and transfers money from the victim’s account.
In this example, the attacker has essentially tricked the user into performing an unauthorized action on their behalf. The user is unaware of the attack since they are not actively visiting the banking application or performing any actions on it.
Preventing Cross-Site Request Forgery (CSRF)
To prevent CSRF attacks, there are several best practices and techniques that developers can implement in their web applications. These include:
1. Implementing CSRF Tokens
CSRF tokens are a unique identifier that is generated by the server and embedded in each form submitted to it. When a user submits a form, the token is checked against the server to ensure that it matches the one originally generated. This helps to ensure that HTTP requests sent to the server are legitimate and have been initiated by the user.
To implement CSRF tokens in your web application, you can follow these steps:
- Generate a unique token for each session.
- Embed this token in HTML forms as a hidden input field.
- When processing form submissions, check if the token matches what was originally generated for that session.
- Reject requests with an invalid or missing token value.
2. Implementing SameSite Cookies
SameSite cookies are used to prevent cross-site request forgery attacks by restricting cookie access to same-origin requests only. This means that cookies cannot be accessed by third-party websites, preventing attackers from exploiting them to carry out CSRF attacks.
To implement SameSite cookies in your web application, you can follow these steps:
- Set the SameSite attribute of cookies as ‘Strict’ or ‘Lax’.
- Ensure all cookies used by your application have this attribute set.
- Use HTTPS protocol for all communication between client and server.
- Make sure your web application does not use any deprecated features such as document.write() which can introduce SameSite cookie vulnerabilities.
3. Verify HTTP Referer Header
The HTTP Referer header is a request header that contains the URL of the page that initiated the request. Verifying the HTTP Referer header can help to prevent CSRF attacks by ensuring that requests are only accepted from trusted sources.
To verify the HTTP Referer header in your web application, you can follow these steps:
- Verify that the HTTP Referer header is present in all incoming requests.
- Check if the value of HTTP Referer matches your web application’s domain name.
- Reject requests with invalid or missing HTTP Referer headers.
Cross-Site Request Forgery (CSRF) attacks remain a serious threat to web applications that do not implement sufficient security measures. You can prevent CSRF attacks by implementing best practices and techniques such as CSRF tokens, SameSite cookies, and verifying HTTP Referer headers.
What is Content Security Policy (CSP)?
Content Security Policy (CSP) is a security header that website owners can enable on their website to restrict what content can be loaded on their site. This helps to prevent malicious code from being injected into the site through XSS attacks.
The CSP header, when enabled, specifies which sources are allowed to be loaded on a webpage. These sources are defined by the website owner and include things like scripts, images, stylesheets, and fonts. By telling the browser what sources are allowed, it can block any requests for resources from other domains or unauthorized sources.
A CSP policy consists of one or more directives that define which types of content are allowed or disallowed on a webpage. These directives can be used to specify which sources are allowed for each type of content.
For example, the script-src directive specifies which scripts are allowed to run on the page. The default-src directive specifies where all types of resources should come from if no other directive overrides it.
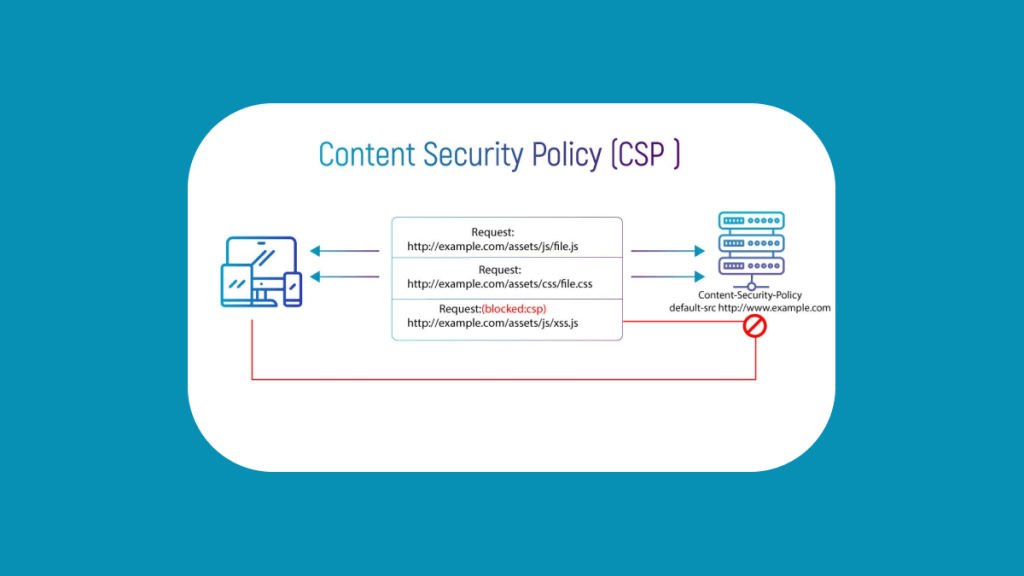
How does Content Security Policy work?
When a user visits a website with CSP enabled, their browser reads the policy specified in the response header and enforces it. If any resources requested by the webpage do not match the policy specified in the header, they will not be loaded.
For example, if a script tag attempts to load an external JavaScript file from an unauthorized domain, it will not be executed because it violates the script-src directive set in the CSP policy.
CSP policies can also help mitigate cross-site scripting attacks by preventing malicious scripts from being executed on a webpage even if they are injected into the page through user input. This is because CSP policies can block inline scripts and prevent them from being executed.
How to enable Content Security Policy
To enable CSP on your website, you need to add a Content-Security-Policy header in the HTTP response. This header should specify the policy directives that you want to enforce on your website.
For example, if you want to only allow scripts from your own domain and from cdnjs.cloudflare.com, you can use the following CSP header:
Content-Security-Policy: default-src 'self' cdnjs.cloudflare.com; script-src 'self' cdnjs.cloudflare.com;This header tells the browser that only scripts from your own domain and cdnjs.cloudflare.com are allowed to be loaded on the webpage. The default-src directive specifies that all other types of resources should come from your own domain.
It’s important to note that CSP policies can be complex, especially for larger websites with many sources of content. It’s recommended that you use a tool like Report URI (https://report-uri.com/) or Google’s CSP Evaluator (https://csp-evaluator.withgoogle.com/) to help create and test your policies before implementing them on your live site.
Best Practices for using Content Security Policy
Enabling CSP on your website is just one step towards improving JavaScript security. Here are some best practices for using CSP effectively:
- Use a restrictive policy: The more restrictive your policy, the less likely it is that malicious content will be loaded onto your website. However, it’s important to balance this with usability, as overly restrictive policies can break website functionality or prevent legitimate content from loading.
- Use whitelists instead of blacklists: It’s generally better to explicitly whitelist approved sources rather than trying to blacklist unauthorized sources. This is because blacklists can easily become outdated as new threats emerge.
- Use subresource integrity (SRI): SRI is a security feature that ensures that external resources, such as JavaScript libraries, are not tampered with or modified during transmission. When using CSP, it’s recommended that you also use SRI to ensure that the resources that are being loaded are exactly what you expect.
- Test your policy: Before implementing your CSP policy on your live site, it’s important to test it thoroughly using tools like Report URI or Google’s CSP Evaluator. These tools can help you identify any issues with your policy and ensure that it’s working as intended.
Content Security Policy (CSP) is a powerful security feature that can help prevent cross-site scripting (XSS) attacks by restricting the resources that a webpage can load. By enabling CSP on your website and creating a well-defined policy, you can significantly improve the security of your web application.
However, it’s important to remember that CSP policies can be complex and require careful consideration in order to avoid breaking website functionality or preventing legitimate content from loading. By following best practices such as using whitelists instead of blacklists and testing your policy thoroughly before implementation, you can ensure that your website is secure without sacrificing usability or functionality.
Input Validation and Sanitization
One of the most crucial aspects of JavaScript security is input validation and sanitization.
What is Input Validation?
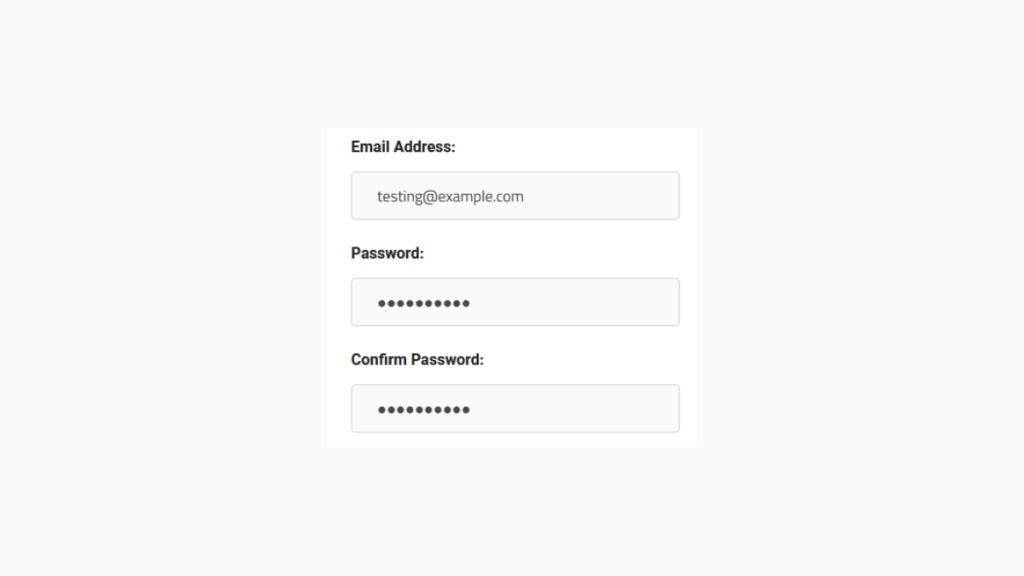
Input validation refers to the process of verifying that the data entered by users through forms or other input mechanisms meet specific requirements. These requirements can range from basic checks such as ensuring that a field is not empty to more complex ones such as validating email addresses or credit card numbers.
The goal of input validation is to prevent users from entering malicious or incorrect data that can cause errors or jeopardize the system’s security.
Types of Input Validation
There are two types of input validation:
- Client-Side Validation
Client-side validation happens on the user’s computer before submitting data to the server. This type of validation provides instant feedback to users and reduces server load by catching invalid inputs before they’re submitted.
However, client-side validation can’t be trusted entirely since it happens on the client-side, which means attackers can bypass it easily by modifying scripts or using tools such as browser extensions.
- Server-Side Validation
Server-side validation involves validating user inputs on the server-side after they have been submitted. This type of validation provides better security since it can’t be bypassed by attackers.
Additionally, server-side validations can perform more complex checks that cannot be performed on the client-side, such as checking if an email address exists or validating credit card information with payment gateways.
Best Practices for Input Validation
To ensure effective input validation:
- Use Whitelisting
Whitelisting is the process of allowing only specific characters or values to be entered in a field. This approach prevents attackers from entering malicious data such as SQL injections or arbitrary code. - Use Regular Expressions
Regular expressions are strings that describe search patterns. They’re used to validate user inputs such as email addresses, phone numbers, and zip codes. - Validate Input Data Types
Ensure that the expected input data types match the actual data types. For instance, if a field is designed to accept numbers, validate that only numeric values are entered. - Avoid Trusting User Inputs
Never trust user inputs entirely since attackers can bypass client-side validation by modifying scripts or using tools such as browser extensions. - Implement Captchas and Rate Limiting
Captchas are tests designed to differentiate between humans and bots by asking users to perform specific tasks such as identifying images or entering characters in a text box.
Rate limiting involves limiting the number of requests made per second by an IP address or user account to prevent brute force attacks.
What is Input Sanitization?
Input sanitization refers to the process of removing potentially harmful characters from user inputs before they’re processed or stored in a database. This approach ensures that no unauthorized code can be executed through user inputs, thereby preventing attacks such as cross-site scripting (XSS).
Types of Input Sanitization
There are two types of input sanitization:
- Blacklisting
Blacklisting involves identifying and removing specific harmful characters from user inputs before processing them. - Whitelisting
Whitelisting involves allowing only specific safe characters in user inputs while blocking all others.
Best Practices for Input Sanitization
To ensure effective input sanitization:
- Use Prebuilt Libraries and Frameworks
Prebuilt libraries and frameworks such as DOMPurify and jQuery can help automate input sanitization tasks, allowing developers to focus on other aspects of development. - Use Regular Expressions
Regular expressions can be used to filter out potentially harmful characters such as script tags, HTML tags, and SQL commands. - Use Encoding
Encoding refers to converting certain characters into their equivalent HTML entities, preventing them from being executed as code. - Store Data in Prepared Statements or Stored Procedures
Storing data in prepared statements or stored procedures can help prevent SQL injection attacks by ensuring that user inputs aren’t executed as code.
Input validation and sanitization are crucial aspects of JavaScript security that cannot be overlooked. By following best practices for input validation and sanitization, you can ensure that your applications are secure from common attacks such as XSS and SQL injections.
Why Properly Declaring Variables is Important
When declaring a variable in JavaScript, it is crucial to specify its data type. By specifying the data type, you can ensure that the variable holds only the expected values, which can help prevent issues like unexpected behavior and security vulnerabilities.
For example, suppose you have a variable that holds a user’s email address. If you do not declare this variable as a string explicitly, it could hold any value, including an object or function. This could result in unexpected behavior or security vulnerabilities if the code assumes that the value of the variable is a string.
Best Practices for Declaring Variables
- Always use
letorconst
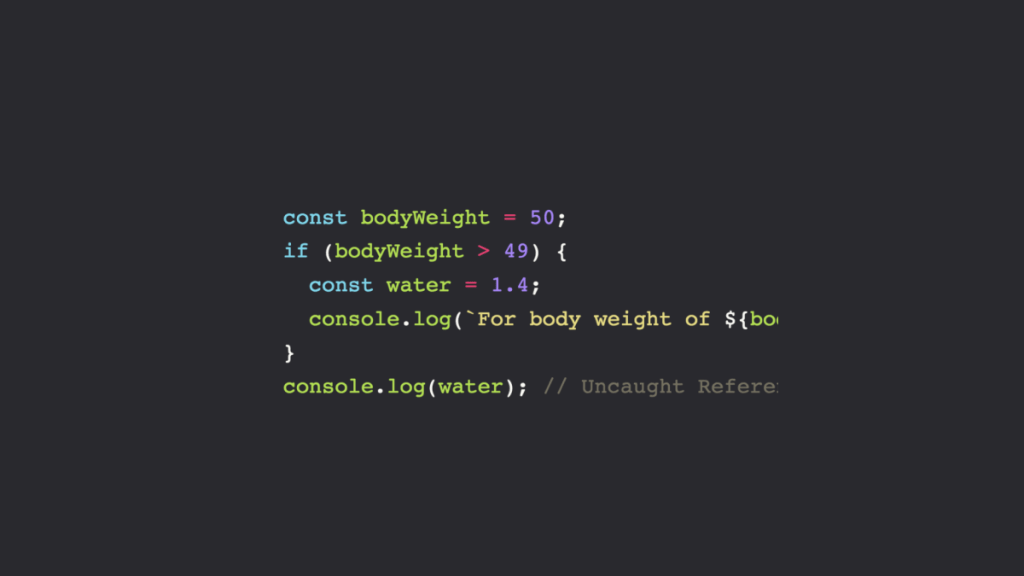
When declaring variables in JavaScript, always use let or const. Avoid using var, as it has some unpredictable behaviors and can lead to difficult-to-debug issues.
- Declare Variables with Meaningful Names
It’s essential to give your variables descriptive names that accurately convey their purpose. Avoid using single-letter variable names or non-descriptive names like “foo” and “bar.” Instead, use descriptive names that give readers an idea of what the variable represents.
- Declare Variables Close to Their Use
Declare variables as close as possible to where they are used. This makes it easier for readers to understand how a particular variable is used within the code.
- Explicitly Specify Data Types
Explicitly specifying data types when declaring variables helps prevent errors and security vulnerabilities. Always declare variables as explicitly as possible using const or let followed by the name of your variable and then assign an initial value with an appropriate data type.
For example:
// Declaring a string
const myString = 'Hello World';

// Declaring a number
const myNum = 123;

// Declaring a boolean
const myBool = true;

// Declaring an array
const myArray = [1, 2, 3];

// Declaring an object
const myObject = { name: 'John', age: 30 };- Use Default Values
When declaring variables that might not always have a value or may be undefined, it’s essential to provide default values. This can help prevent errors and unexpected behavior in your code.
For example:
// Assigning default value to a variable
const myVar = someValue || defaultValue;
In this example, if someValue is undefined or falsy, the defaultValue will be used as the value of myVar.
- Don’t Reuse Variables
Avoid reusing variables for different purposes within your code. This can lead to confusion and unexpected behavior.
- Initialize Variables when Declared
Always initialize variables when declared. This helps prevent errors and allows readers to understand how the variable is used within the code.
Properly declaring variables in JavaScript is crucial for writing secure and efficient code. By following these best practices, you can ensure that your code is more readable, maintainable, and secure. Remember to always use explicit data types when declaring variables, declare them close to their use, provide default values where necessary and avoid reusing them for different purposes within your code.
Avoiding eval() – A Crucial Best Practice for JavaScript Security
Hackers can exploit these vulnerabilities to run malicious code on your website or steal sensitive user information. As a developer, it is your responsibility to ensure the security of your website by following best practices and techniques.
One such best practice is avoiding the use of eval() in your code. In this article, we will discuss what eval() is, why it poses a security risk, and how you can avoid using it.
Understanding eval()
eval() is a function in JavaScript that evaluates a string as if it were JavaScript code. It takes a string argument and executes it as code in the current scope. Here’s an example:
let x = 10;
let y = 20;
let result = eval("x + y");
console.log(result); // Output: 30
In this example, the string “x + y” is passed to eval(), which adds the values of x and y (10 + 20) and returns the result (30).
Why Using eval() Poses a Security Risk
While eval() may seem like a convenient way to execute dynamic code at runtime, its use can pose serious security risks for your website. Here are some reasons why:
- Injection Attacks
Eval() can be used to execute arbitrary code injected by attackers into your website through user input fields such as search boxes or form data. This means that an attacker could potentially execute malicious code on your website without your knowledge or consent.
- Code Obfuscation
Malicious actors can also use eval() to obfuscate their code to make it more difficult for security measures such as firewalls and antivirus software to detect and stop them.
- Performance Issues
Using eval() can negatively impact the performance of your website as it is an expensive operation. Every time eval() is called, the code has to be parsed and executed, which can slow down your website.
Avoiding eval()
Now that you understand why using eval() can pose a security risk, let’s look at some ways to avoid using it in your code.
- Use JSON.parse()
If you need to evaluate a string value as JSON data, use JSON.parse() instead of eval(). JSON.parse() is more secure because it only parses valid JSON data and does not execute arbitrary code. Here’s an example:
let jsonString = '{"name":"John", "age":30, "city":"New York"}';
let obj = JSON.parse(jsonString);
console.log(obj.name); // Output: John- Use Function()
If you need to execute dynamic code at runtime, use Function() instead of eval(). Function() allows you to create a new function from a string and execute it in a new scope without modifying the current scope. Here’s an example:
let x = 10;
let y = 20;
let sum = new Function('x', 'y', 'return x + y;');
console.log(sum(x,y)); // Output: 30- Use Regular Expressions
If you need to perform dynamic operations on strings such as searching or replacing text patterns, use regular expressions instead of eval(). Regular expressions provide a more secure way to manipulate strings by only allowing for specific patterns of characters.
let str = "Visit Twitter!";
let n = str.search(/twitter/i);
console.log(n); // Output: 6- Avoid Dynamic Code Execution
Finally, one of the best ways to avoid using eval() altogether is to avoid executing dynamic code whenever possible. Instead, consider using static values or pre-defined functions in your code.
In conclusion, the use of eval() can pose a significant security risk to your website. By avoiding its use and following best practices such as using JSON.parse(), Function(), regular expressions, and avoiding dynamic code execution wherever possible, you can ensure that your website is more secure and less susceptible to malicious attacks. Remember always to prioritize security when developing web applications and stay informed about the latest security best practices and techniques.
Handling Errors and Exceptions in JavaScript
Errors and exceptions are terms used interchangeably in programming to describe problems encountered during the execution of code. An error occurs when a syntax or logical error is encountered during the compilation phase. On the other hand, an exception occurs when an error is encountered during runtime.
In JavaScript, there are various types of errors that can occur. Some common ones include:
- SyntaxError – This error occurs when there is a problem with the syntax of your code.
- ReferenceError – This error occurs when you try to reference a variable or function that does not exist.
- TypeError – This error occurs when you try to perform an operation on a data type that is not supported or compatible with the operation.
- RangeError – This error occurs when you try to use a number outside of its valid range.
- EvalError – This error occurs when there is an issue with evalling code.
Exceptions can also be caused by external factors such as network failures or server crashes.
Handling Errors and Exceptions
Handling errors and exceptions effectively can prevent your code from breaking down completely. Here are some ways you can handle errors and exceptions in JavaScript:
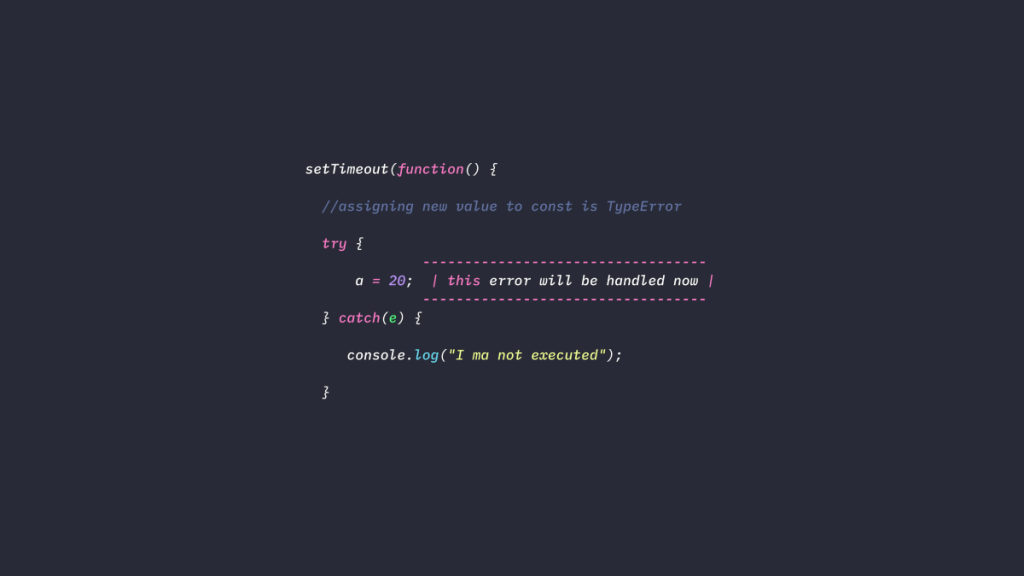
- Try-Catch Block
One effective way of handling exceptions in JavaScript is by using the try-catch block. The try block contains the code you want to execute while the catch block contains the code you want to execute if an exception occurs within the try block.
For example:
try {
  //Code that may throw an exception
}
catch (error) {
  //Code to execute if an exception occurs
}- Throw Statement
The throw statement is used to throw an exception. This statement can be used with the try-catch block to create custom exceptions or handle built-in ones.
For example:
throw new Error("This is a custom error message");- Finally Block
The finally block is executed regardless of whether an exception occurs or not. It can be used to clean up resources or perform other operations.
For example:
try {
  //Code that may throw an exception
}
catch (error) {
  //Code to execute if an exception occurs
}
finally {
  //Code that will always execute
}
Best Practices for Preventing Errors and Exceptions
Preventing errors and exceptions is always better than handling them. Here are some best practices you should follow to prevent errors and exceptions in your JavaScript code:
Use Strict Mode
Strict mode is a feature in JavaScript that enforces stricter rules for coding. It helps prevent common errors such as using undeclared variables or assigning values to read-only properties.
To enable strict mode, add the following code at the beginning of your JavaScript file or function:
"use strict";Validate Input Data
Validating input data from users or external sources is crucial in preventing errors and exceptions. Always validate data before using it in your code to ensure it meets the expected format and type.
For example, you can use regular expressions to validate email addresses, phone numbers, and other input data.
Handle Asynchronous Operations Correctly
Asynchronous operations such as AJAX requests and timeouts can also cause errors and exceptions. Always handle asynchronous operations correctly by using callbacks, promises, or async/await functions.
In conclusion, handling errors and exceptions effectively is essential in creating secure and reliable JavaScript code. Use try-catch blocks, throw statements, and finally blocks to handle exceptions, and follow best practices such as using strict mode, validating input data, and handling asynchronous operations correctly to prevent them. By following these guidelines, you can create robust and error-free JavaScript code.
Using HTTPS and Secure Cookies

One of the most common ways to ensure security is by using HTTPS and secure cookies. In this article, we’ll discuss what HTTPS and secure cookies are, how they work, and why they’re essential in JavaScript security best practices.
What is HTTPS?
HTTPS stands for Hyper Text Transfer Protocol Secure. It’s an encrypted version of HTTP, which is the protocol used for communication between web servers and clients (browsers). HTTPS uses SSL/TLS certificates to encrypt data that’s transmitted between the server and client, making it more secure than traditional HTTP.
When you visit a website using HTTPS, your browser makes a request to the server for a secure connection. The server responds with its SSL/TLS certificate, which contains information about the server’s identity and its public key. Your browser then verifies this certificate against a trusted authority (like a Certificate Authority) to ensure that it’s valid. Once both parties agree on the encryption protocol to be used, all data exchanged between them will be encrypted and protected from interception.
Why use HTTPS?
The use of HTTPS is essential for several reasons:
- Confidentiality: Encrypted data can’t be read or intercepted by third parties during transmission.
- Integrity: Encrypted data can’t be altered or modified during transmission without detection.
- Authentication: SSL/TLS certificates are used to verify the identity of servers, preventing man-in-the-middle attacks.
- Trust: The use of HTTPS instills trust in users that their sensitive information (such as personal details or credit card numbers) is being transmitted securely.
How to implement HTTPS in JavaScript applications
Implementing HTTPS in JavaScript applications involves configuring web servers and adding SSL/TLS certificates to them. Here are the steps to follow:
- Obtain an SSL/TLS certificate from a trusted Certificate Authority (CA).
- Install the certificate on your web server.
- Configure your web server to use HTTPS.
- Update all links in your application to use HTTPS instead of HTTP.
- Test and verify that the implementation works as expected.
What are secure cookies?
Cookies are small pieces of data stored on a user’s computer by a website. They’re used to maintain information about a user’s session, preferences, and other details relevant to their interaction with the website. Secure cookies are a type of cookie that’s only transmitted over an HTTPS connection and can’t be accessed by JavaScript or other scripts running on the client-side of the web page.
Why use secure cookies?
Secure cookies are essential for several reasons:
- Confidentiality: Since secure cookies can only be transmitted over HTTPS, they can’t be intercepted or read by third parties during transmission.
- Integrity: Secure cookies can’t be tampered with or modified during transmission without detection.
- Authentication: Secure cookies can be used to authenticate users and prevent unauthorized access to sensitive areas of a website.
- Compliance: The use of secure cookies helps websites comply with various data protection regulations, such as GDPR or CCPA.
How to implement secure cookies in JavaScript applications
Implementing secure cookies in JavaScript applications involves configuring web servers and adding cookie attributes that ensure they’re only transmitted over HTTPS connections. Here are the steps to follow:
- Set the ‘Secure’ attribute when defining cookies so that they’re only transmitted over HTTPS connections.
- Set the ‘HttpOnly’ attribute when defining cookies so that they can’t be accessed by JavaScript or other scripts running on the client-side of the web page.
- Use short-lived session IDs for session management purposes and implement mechanisms to regenerate them periodically.
- Implement CSRF tokens (Cross-Site Request Forgery) to prevent attackers from exploiting session vulnerabilities.
- Test and verify that the implementation works as expected.
In conclusion, using HTTPS and secure cookies is essential in JavaScript security best practices. They provide confidentiality, integrity, authentication, and compliance to websites that handle sensitive data such as personal details or financial information. Implementing HTTPS involves configuring web servers and adding SSL/TLS certificates, while implementing secure cookies involves configuring cookie attributes and implementing CSRF tokens. By following these best practices, businesses can ensure their online assets are protected from cyber-attacks and instill trust in their users.
Regularly updating libraries and frameworks

Libraries and frameworks are an essential part of modern web development, providing developers with pre-built, reusable code that can speed up the development process.
However, using outdated libraries and frameworks can put your website or application at risk of cybersecurity threats. Hackers are always on the lookout for vulnerabilities in popular libraries and frameworks to exploit. As a result, it’s crucial to regularly update your libraries and frameworks to ensure that you’re using the latest version with all the necessary security patches.
Why Is It Important to Regularly Update Libraries and Frameworks?
Using outdated libraries or frameworks can lead to vulnerabilities in your code that hackers can exploit. Once a vulnerability is discovered in a library or framework, hackers can use it to gain access to your system or steal sensitive data. This issue is particularly prevalent in open-source software since anyone can access the source code.
To mitigate this risk, library and framework developers release regular updates that address known vulnerabilities or bugs. It’s essential to apply these updates regularly since they help strengthen your application’s security posture.
Moreover, outdated software may not be compatible with new browsers’ features or even create conflicts with other scripts on your website. Updating your software ensures smooth operation of all applications on your site while improving performance.
How Can You Update Your Libraries and Frameworks?
Updating libraries and frameworks may sound daunting, but it’s relatively simple once you understand how it works. Here are some tips on how you can update:
- Keep track of updates
Most popular libraries have an active developer community who regularly releases updated versions. You should keep track of these updates by subscribing to their blogs or newsletters.
- Check compatibility
Before updating any library or framework, check its compatibility with other features of your website. Make sure that the new version doesn’t break any existing code or create conflicts with other scripts.
- Backup your code
Before making any updates, make sure to back up your entire codebase, including your database and files. This is an essential step since it helps you restore your website in case anything goes wrong during the update.
- Test thoroughly
After updating, test all features of your website to ensure that everything is working correctly. If you notice any bugs or issues, address them immediately before they cause further problems.
- Use automation tools
Using automation tools like npm can make the updating process faster and more efficient. These tools can automatically update libraries and frameworks by running a single command.
What Should You Consider Before Updating?
Updating libraries and frameworks can be a time-consuming process, so it’s essential to consider some factors before getting started:
- Impact on development cycles
Updating libraries and frameworks can impact development cycles since it requires testing for compatibility and ensuring that everything works smoothly.
- Backwards compatibility issues
New updates may have backward incompatibility issues with previous versions of the framework or library, which can cause conflicts with existing scripts.
- Security patches
Some updates may contain critical security patches while others may only have bug fixes; you should evaluate each update’s need based on their changelogs.
Regularly updating libraries and frameworks is an essential component of good JavaScript security best practices since outdated software poses a significant security risk for any website or application. Keeping track of new releases, checking compatibility, backing up your code base, testing thoroughly and using automation tools will help make the updating process smoother while minimizing risks associated with old software vulnerability exploitation.
Summary
If you’ve made it this far, fantastic! This guide turned out to be an absolute behemoth – clocking in at over 6,000 words. But as far as security goes – you can’t put a price on educating yourself about the best practices.
The good news is that once you understand the fundamentals, particularly those outlined in this guide, you will need to spend less time studying security, and instead, you’ll be able to focus on building your (secure) applications.